Same Receiver, Totally Different Results
ADS-B range has gotten complicated with all the conflicting advice flying around. Buy the same RTL-SDR dongle and 1090 MHz antenna as your friend. Set yours up on a rooftop. Watch aircraft roll in from 180 nautical miles out. Your friend puts theirs in an attic window and maxes out at 50 nm on a good day — a good day. Same hardware. Wildly different numbers. That is not a defective unit. That is physics doing exactly what physics does.
As someone who spent a full year troubleshooting my own ADS-B setup, I learned everything there is to know about why range behaves so unpredictably. Today, I will share it all with you.
“Why does my range vary so much?” is probably the most common question in aviation enthusiast forums, right after “Is my antenna bad?” Reasonable question. The obvious answer — identical equipment should mean identical performance — sounds airtight. But ADS-B reception is not really about the radio. It is about geometry, signal path quality, and a dozen environmental variables that shift week to week. So, without further ado, let’s dive in.
Antenna Height Changes Everything
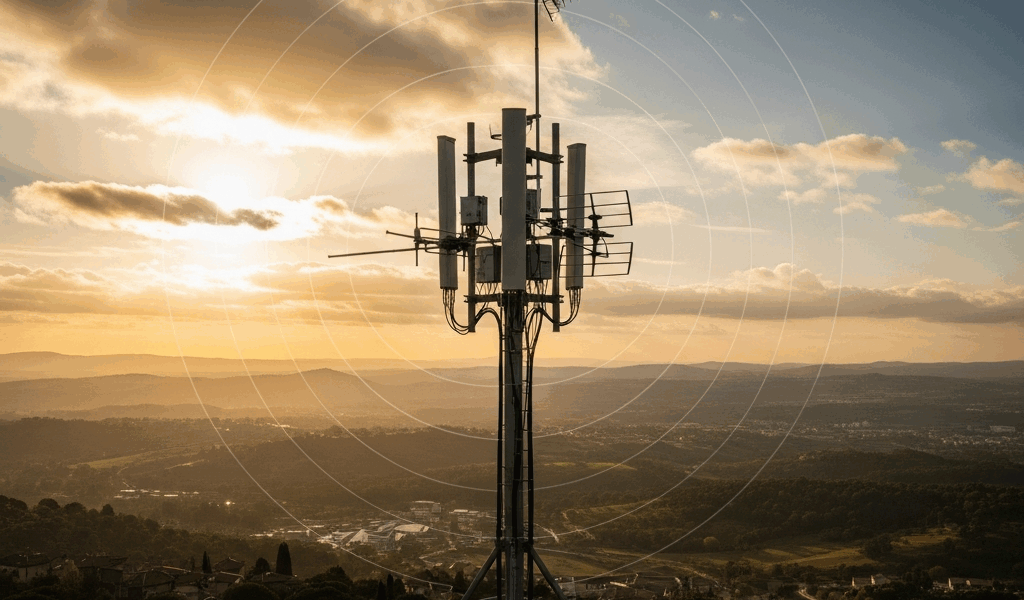
Antenna elevation is the single biggest factor in ADS-B range. Not your receiver model. Not your antenna type. Not filtering. Height.
But what is the actual mechanism here? In essence, it’s line-of-sight geometry. But it’s much more than that. ADS-B signals travel in roughly straight lines. An aircraft cruising at 35,000 feet sits within line-of-sight of an antenna up to 250 miles away — if nothing interrupts the path. Terrain, buildings, and Earth’s own curvature cut that number down fast when your antenna sits low. The relationship does not scale linearly either. Every 10 meters gained does not hand you 10 nautical miles. Improvement follows the square root of height. Jump from 5 meters to 20 meters and you might gain 80 nautical miles. Jump from 20 to 35 meters and maybe 60. Gains compress as altitude climbs, but they never fully stop mattering.
I learned this by accident. My first setup lived in an attic window at 7 meters. Range peaked at 65 nm on clear days. I moved the antenna to the roof peak — 12 meters, a five-meter difference — and gained 35 nm of max range. Not a perfect match to the square root formula, but close enough. Height was doing the work, obviously.
Practical benchmarks worth knowing: expect roughly 100–120 nm max range from 10 meters elevation in a suburban area with light terrain masking. Budget 30–40 nm per additional 10 meters up to about 20 meters. Beyond 20 meters, gains taper noticeably. An antenna at 5 meters typically sees 40–70 nm. An indoor window setup at 3 meters? Maybe 20–40 nm, depending on how much metal sits between you and the horizon.
Probably should have opened with this section, honestly. Most people fighting weak range are not fighting hardware defects. They are fighting placement.
Gain, Filtering, and the Noise Floor Problem
Once height is sorted, receiver gain becomes relevant. This is where conventional wisdom breaks down badly.
A higher-gain antenna sounds like a straightforward win. More gain, more signal collected. That part is true. The catch: 1090 MHz antennas with high gain use a narrow vertical beam to achieve those numbers. A 9 dBi antenna might be excellent at pulling signals from aircraft at cruise altitude while completely missing aircraft climbing or descending below 5,000 feet. A 2–3 dBi omnidirectional antenna sacrifices some top-end range but catches traffic across a much wider range of angles. That’s what makes lower-gain omnidirectional designs endearing to us hobbyist feeders — total traffic count often beats the headline range figure.
The real culprit is usually not gain at all. It is noise. Your SDR dongle has a noise floor. Your antenna has one. Your RF environment has one. In a rural area, the noise floor sits clean and low — weak signals amplify without drowning in static. In an urban area packed with cell towers, WiFi routers, commercial radio transmitters, and power line interference, the noise floor climbs. A signal that would be perfectly readable in a quiet field becomes indistinguishable from background noise three blocks from a cell tower.
An LNA (low-noise amplifier) helps, but only when paired with filtering. A decent SAW filter centered at 1090 MHz runs $20–$40 and can cut out-of-band noise by 50 dB. In cities, that filter is the difference between seeing aircraft at 80 nm and seeing them at 200 nm. I added a home-built cavity filter to my setup — took about four hours, cost maybe $15 in parts — and watched range jump from 140 nm to 190 nm within a week. Same antenna. Same height. Different filtering.
Don’t make my mistake. I bought a $60 LNA first, before adding any filtering. The LNA amplified signal and noise with equal enthusiasm. The filter would have addressed the actual problem. Buy the filter first.
Environmental Factors That Shift Range Day to Day
Your setup is dialed in. Tuesday morning rolls around and range drops 40 nm. Nothing changed. Antenna is still at the same height. You did not swap a single cable overnight.
Atmospheric conditions control propagation in ways most people underestimate. Temperature inversions — warm air sitting above cooler air near the surface — bend radio waves and extend range dramatically. We’re talking 300+ nm from a modest antenna height during a strong inversion. That’s atmospheric ducting. Signals refract along the temperature boundary and travel far beyond their normal geometric limit. When the inversion breaks, range collapses back to baseline. Humid mornings tend to produce this effect; it often reverses by early afternoon.
Seasonal interference is real too. Heating season brings electrical noise from furnaces and older transformers — especially in neighborhoods with aging infrastructure. Summer thunderstorms, even ones 200 miles away, corrupt the 1090 MHz band noticeably. A construction crew running power tools two streets over can spike local RF noise for hours. You cannot control any of these events, but recognizing them prevents a lot of unnecessary hardware swaps.
Terrain masking also shifts with time of day and season. A hill 10 km south that blocks low-altitude traffic during winter propagation conditions might not block it in summer — the signal path geometry changes as sun angles and atmospheric layering shift. I’m apparently more affected by my eastern ridge in December than in July, and my coverage maps reflect that clearly. Your coverage area is dynamic. Always has been.
How to Diagnose and Benchmark Your Own Setup
Stop guessing. Map it.
Log into ADS-B Exchange or spin up Virtual Radar Server on a local machine — a cheap Raspberry Pi 4 handles this without breaking a sweat. Both tools display your actual coverage as a real-time map overlay. Study that map. Where are the holes? South of your location suggests terrain masking in that direction. Uniformly weak performance across all directions suggests antenna placement or gain is the bottleneck. Coverage that specifically disappears below 5,000 feet suggests a high-gain narrow-beam antenna missing low-altitude traffic.
Pull the polar plot — both tools generate these automatically. A healthy polar plot looks roughly circular with consistent thickness on all sides. A weak one looks lopsided or spiky. Spikes indicate interference from specific directions. Thin sections point to terrain masking or antenna pattern problems. That visual alone cuts troubleshooting time in half.
While you won’t need professional RF test equipment, you will need a handful of reference points. Compare your polar plot against feeders within 5 km of your location — ADS-B Exchange shows nearby contributors. If someone 4 km away sees 250 nm and you see 120 nm with identical antenna types, height and gain are your problems. If they see 250 nm and you see 180 nm, your environment or antenna pattern is costing you roughly 70 nm, which is honestly pretty normal.
Actionable improvements, ranked by actual impact:
- Raise the antenna 5–10 meters if at all possible — roof versus attic placement adds 30–60 nm for most people. Easiest high-impact change on this list, by a wide margin.
- Add a 1090 MHz SAW filter if you are urban or anywhere near RF sources. Budget $30–$50. A Uputronics or FlightAware-branded unit works well. This single change fixes range collapse in noisy environments faster than any other upgrade.
- Swap to an omnidirectional 2–3 dBi antenna if your polar plot shows consistently weak low-altitude coverage. A FlightAware 26″ antenna runs about $45 and often beats a 9 dBi collinear on total aircraft count even when it trails on maximum range.
Range varies because reception lives at the intersection of physics, geometry, and environment — not inside the dongle. Knowing which variable is actually limiting you turns a frustrating guessing cycle into a concrete improvement plan.


Stay in the loop
Get the latest aerodata updates delivered to your inbox.